
Fridge SEAL
Seals are made up of four pieces of PVC gasket with magnetic strips inserted into the top compartment and welded at the four corners to form picture frame shaped seal. For most fridges, the magnetic seals are the only mechanism of a fridge that will ensure doors are tightly shut. Strips can either screw into place or use an arrowhead and are pushed into a groove in the door.
Materials
PVC Compound
| Material-data | AUS-PVC 7899 |
| Density g/cc | 1.41-1.45 |
| Hardness Shore A | 78+3 |
| Tensile Stress N/sq. mm.2 | > 12 |
| Elongation at break % | > 250 |
| Migration of plastizer mg | < 10 |
| Test in tropical conditions | Does not stick |
| Fungicidial material composition | yes |
Magnetic Strips
| Article | Size mm | Number of poles | N/cm | M/spool | Kg/100mt |
| MG9831 616 090 | 9.8 x 3.1 | 3 | 0.36 | 350 | 10.54 |
| MG9327 602 983 | 9.3 x 2.7 | 3 | 0.34 | 400 | 9.07 |
| MG 12432 | 12.4 x 3.2 | 3 |
How to identify the profile
Several things are used to accurately identify the profile required for a seal:
- Make of the fridge / freezer
- Model of the fridge / freezer
- Size of the door seal (correct outside dimensions from outside corner to outside corner)
- Match to profile sheet or profile ring (a cross section photo or in some cases an actual cut piece of the profile will be needed)
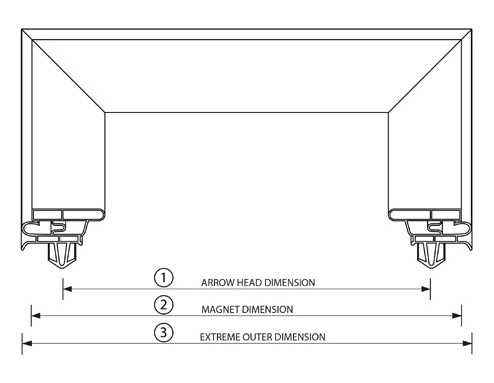
How to measure your door seal
Always measure the outside edge of the door seals to get the most accurate guide. Item 3 in the diagram below “extreme outer dimension” is the best measurement to recreate replacement seals for your door.
Fitting and Adjustment Procedures for flap type seals:
- If your new seal has gotten a bit twisted in transit to you, we recommend laying it out on a clean surface in the sun for an hour to allow any kinks to straighten out again.
- Remove all screws from the upper top half of the seal and replace with the new seal.
- Put the screws back in by pushing them through the flap of the seal and lightly tighten only.
- Proceed to repeat the same but starting now from the bottom and working your way up the sides of the seals but ensuring only to tighten the screws loosely.
- Apply some lubricant like Vaseline or silicone spray onto the hinge side of the seal and gently shut the door, ensuing it isn’t catching or doubling over at any point.
- If the door is closing smoothly but there are gaps between the fridge and the seal, hold the top corners of the seal and twist backwards and forwards in clockwise and anticlockwise directions until the gaps are no longer visible or reduced.
- It is quite common for seals to require mild heat with a hair drier to soften the PVC and allow the seal to expand into the fridge retainer properly. After heating the seals do not open the door until the seal has cooled down (approximately 10 minutes). This may be repeated a few times until the seal takes on the shape of your fridge.
- From there, screws can be tightened as required to ensure a snug fit.
Fitting and Adjustment Procedures for bead type seals:
- If your new seal has gotten a bit twisted in transit to you, we recommend laying it out on a clean surface in the sun for an hour to allow any kinks to straighten out again.
- Remove the current seal from the fridge’s plastic retainer by loosening the screws to allow the seals to slip out from under the recess, being careful not to damage the fridge at the corners in particular.
- Beginning at the top, position the seal behind the groove paying particular attention to the corners. The bead part of the seal will be completely hidden underneath the groove if done correctly.
- Softly tighten the screws across the top of the seal, and then softly tighten working from the bottom up.
- Apply some lubricant like Vaseline or silicone spray onto the hinge side of the seal and gently shut the door, ensuing it isn’t catching or doubling over at any point.
- If the door is closing smoothly but there are gaps between the fridge and the seal, hold the top corners of the seal and twist backwards and forwards in clockwise and anticlockwise directions until the gaps are no longer visible or reduced.
- It is quite common for seals to require mild heat with a hair drier to soften the PVC and allow the seal to expand into the fridge retainer properly. After heating the seals do not open the door until the seal has cooled down (approximately 10 minutes). This may be repeated a few times until the seal takes on the shape of your fridge.
- From there, screws can be tightened as required to ensure a snug fit.
Fitting and Adjustment Procedures for push – in seals:
- If your new seal has gotten a bit twisted in transit to you, we recommend laying it out on a clean surface in the sun for an hour to allow any kinks to straighten out again.
- Remove the current seal from the fridge’s plastic retainer, being careful not to damage the fridge at the corners in particular.
- Beginning at the top, position the arrowhead of the seal in the door retainer cavity and push to pop the arrowhead into the track.
- It is sometimes required to manoeuvre the seal while applying pressure to ensure a snug fit.
- Fit the seal across the top and down the sides by around 150mm.
- Move to the bottom of the seal and repeat again in reserve, working your way back up the sides.
- Ensure the seal is pushed in correctly at all edges before shutting the door. While shutting pay particular to the hinge side and ensure its not getting bent or crushed out of shape in the closing.
- It is quite comment for seals to require mild heat with a hair drier to soften the PVC and allow the seal to expand into the fridge retainer properly. After heating the seals do not open the door until the seal has cooled down (approximately 10 minutes). This may be repeated a few times until the seal takes on the shape of your fridge.
Brands
-

ADMIRAL (13)
-
Admiral / Hoover (59)
-
AEG (2)
-
Agni (1)
-
Amana (45)
-
Astor (17)
-
Astracool (1)
-
BEGAY (1)
-
Bonaire (2)
-
Bosch (2)
-
Brevline (1)
-
CELESTIAL (3)
-
Celestial / Waltons (5)
-
CENTREX (1)
-
CENTRIX (1)
-
CHESCOLD (2)
-
COLDA (1)
-
CONIA (2)
-
CONSUL CAMPING (6)
-
DAEWOO (12)
-
DEFY (2)
-
EDESSA (1)
-
ELECTRICE (3)
-
Electrolux - DOMESTIC (26)
-
ENGELS (1)
-
FAGOR (2)
-
Fisher Paykel (36)
-
FRIDGEMASTER (2)
-
FRIG (31)
-
FRIG-GM (1)
-
Frigidaire (339)
-
FUJISTU (1)
-
FUJISTU GENERAL (20)
-
G.A.C. (2)
-
GASTEC (1)
-
General Electric (71)
-
General Electric - Rank (174)
-
GIBSON (1)
-
GOLDAIR (2)
-
GOLDSTAR (5)
-
GORENGI PACIFIC (1)
-
GRAM ELDON (2)
-
GVA (2)
-
HEALING (1)
-
HG PALMER (1)
-
HIRUNDO (1)
-
HISENCE (4)
-
Hitachi (21)
-
HMV (1)
-
HOMEMAKER (2)
-
HOOVER (70)
-
IGNIS (134)
-
INDESIT (23)
-
Kelvinator (1019)
-
KENWOOD (1)
-
KIC (4)
-
KRC-STH AFRICA (2)
-
LEM (1)
-
Lemair (18)
-
Leonard (46)
-
LG (53)
-
MALLEYS (21)
-
Malleys - Whirlpool (30)
-
MAYTAG (2)
-
Metters (3)
-
MIELE (3)
-
MISTRAL (1)
-
MITSUBISHI (25)
-
NATIONAL (9)
-
NEC (20)
-
Norge (15)
-
PACIFIC (97)
-
PALSONIC (1)
-
PAN ELECTRIC (2)
-
Panasonic (4)
-
Philips (425)
-
Pope Norge (4)
-
Prestcold (6)
-
PRIME (1)
-
RANK ARENA (12)
-
Samsung (47)
-
Sanyo (31)
-
Sharp (28)
-
Simpson (24)
-
SMEG (2)
-
SOUTH AFRICIAN FRIDGE (1)
-
Steel Glacier (1)
-
Taver (2)
-
TEDZ (1)
-
THOMPSON FRIDGE CO (1)
-
TOSHIBA (7)
-
Vulcan (5)
-
Westinghouse (443)
-
Westinghouse - AWA (227)
-
WHIRLPOOL (7)
-
Williams (1)
-
Zanussi (7)
-
ZOPPAS (8)